Northeast Comanche Tribe held a 3-day fly-in on the second weekend of June, with 14 attending. Friday evening, after we all checked in at the Nantucket Inn, their van delivered us to town for dinner at Arno’s for a nice house salad followed by a choice of steak au poivre or lobster crusted codfish and dessert. Delicious!
Saturday morning, after a nice breakfast at the Inn, we were picked up for a guided island bus tour, with a very knowledgeable local schoolteacher driver. She stopped often to explain more of Nantucket’s history and mentioned many little known bits of information. The bus dropped us off at the Nantucket Whaling Museum where we saw presentations on whaling and its history on Nantucket. Afterwards there was free time to stroll and lunch in town.
The Inn provides hourly shuttle vans to and from town, so transportation was no problem.
Dinner Saturday night was at AK Diamonds, a well-known steakhouse near the Inn. Again a salad, a choice of 12 oz sirloin steak or shrimp scampi followed by generous desserts, and again delicious!
On Saturday afternoon we held a workshop on basic formation flight, along with other topics of interest, in preparation for a planned formation flight the next morning. However the low ceilings on Sunday made us scrub the actual flight. In fact, some of us elected to stay over and depart on Monday. A tough call, but a real PIC is up to the task – “Sorry, honey, but we’ll just have to stay one more night on the island.” All in all it turned out to be a great time on the Grey Lady!
New Hampshire’s Alton Bay ice airport opened for the 2019 season on Jan 22. The seasonal, public-use runway on Lake Winnipesaukee, is at the charted location of the Alton Bay Seaplane Base in Alton Bay, and is believed to be the only charted ice airport in the 48 contiguous United States.

Airport manager Paul LaRochelle announced the runway’s opening on the ice airport’s Facebook page. He wrote. “I’m happy to announce Alton Bay ice Runway is now open. The runway is 100 feet wide, 2,730 feet long, with a taxiway 50 feet wide. Runway conditions are good, although a little bumpy in some spots.”
LaRochelle said the depth of the ice reached the required 12 inches on Jan. 16, allowing him and other airport volunteers to begin plowing out the runway, taxiway, and parking ramp. The State of New Hampshire then inspected the runway. The opening was delayed until the weekend’s snowstorm passed and they could plow the airport surfaces again.
The annual Alton Winter Carnival, coordinated by the Alton Business Association, will take place Feb. 17. If flying and runway conditions are good, the airport is sure to be busy. The carnival typically begins at 8 a.m. with a pancake breakfast at the Alton Bay Community Center. Activities such as sleigh rides, bed races, snowmobile events, and a chowder festival continue until 3 p.m.
CTAF is 122.8. The wind is usually is from the north, and Runway 1 is the preferred calm-wind runway. On final, watch for snowmobiles and pedestrians. Plan for a long rollout. When the ice looks black or deep blue from above, it’s likely to be slickest; a light covering of snow actually helps. Bring chocks, and wear boots or water-resistant shoes – there can be pools of water on the surface.
Check Notams for Alton Bay Ice Runway before departing. During the season, LaRochelle updates the airport’s information line, 603-875-3498, as needed. Updates also can be found online on the airport’s Facebook page. Notams are primary, however; if the runway must be closed temporarily, a Notam will be issued before the recording is updated.
If you fly in, stop at Facet Jewelers—at Shoppes on the Bay—and LaRochelle’s wife, Donna, will give you a free certificate for landing on the ice runway at Alton Bay. Alton Bay Ice Runway hats are available for purchase, and several restaurants are within walking distance. Donations toward the maintenance of the ice runway also are accepted. For more information on the Alton Bay ice airport, see “The Iceway is Open,” from the January 2010 AOPA Pilot. Mike Collins AOPA Technical Editor
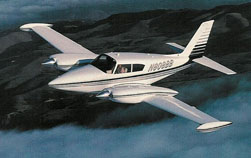
Is there a good-looking, four- to six-place light twin that goes 170
knots on 17gph? Such objectives may seem incompatible in the same
airplane, but the truth is that from 1963 to 1972 Piper built about
2,200 airplanes with those characteristics. We’re talking about the Twin
Comanches. For all its performance, it may be hard for some to believe
that Twin Comanches use fuel injected variants of the venerable — and
nearly bulletproof — 160-horsepower Lycoming O- 320 engine. That’s
right, the same engine used in the Cessna Skyhawk, Piper Super Cub, and
Piper Tri-Pacer, among other plodding, mundane airplanes.
Early model Twin Comanches, designated PA-30s, came out between 1963
and 1965. A bare-bones, single-vacuum-pump, day-VFR-equipped, four-seat
PA-30 (brochures called it the “Sportsman” version) would have cost just
$33,900 or so in those days. For a top-of- the-line “Professional” Twin
Comanche, you paid about $41,200.
In 1965, the PA-30B was introduced. You can tell a B model by its six
seats and third side windows. The options list was expanded to include
wingtip fuel tanks, a heated windshield, propeller anti-ice, and an
oxygen system. (NB: The Twin Comanche is not certified for flight in
known icing conditions.) The tip tanks, which carry an extra 30 gallons
of fuel, proved a very popular option, and by the late 1960s most Twin
Comanches had either been ordered with them or outfitted with
aftermarket tip tanks then manufactured by Brittain Industries.
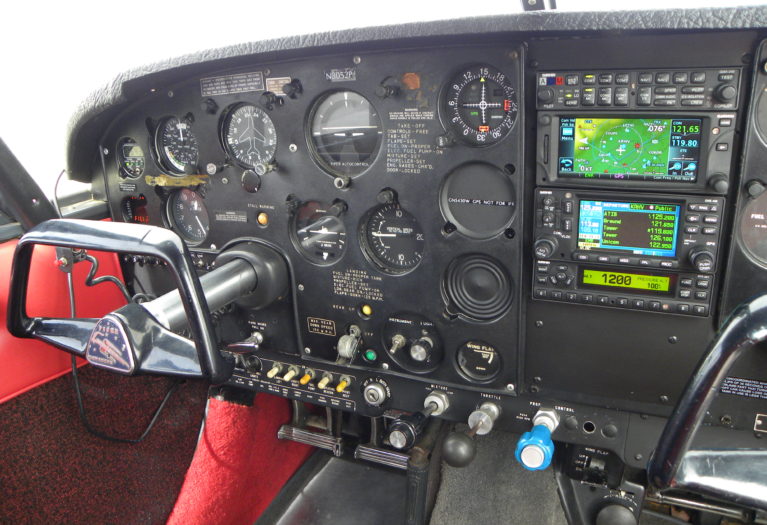
Age belies the instrument panels of the straight PA-30s and the -B
models. By now, many have been heavily modified and improved with the
latest avionics, but an original-condition airplane will have a
non-standard instrument configuration. Old- fashioned, black-background
attitude indicators and backwards-turning, drum-type heading indicators
were used. The heading indicator is where the attitude indicator ought
to be, and the altimeter is over at the lower left, where we’ve come to
expect to see the turn coordinator. Narco Mark 12s were de rigueur in
the early 1960s, so don’t expect too much in the way of avionics
sophistication from a standard-issue early Twin Comanche. Also, human
factors was still an infant science in those days, and old Twin
Comanches show it. For example, all the electrical switches were
identical toggle switches, making them easy to misidentify, and circuit
breakers were kept beneath a trap door below the power quadrant.
The -C and Turbo C models came out in 1968 and brought with them
instrument panels laid out in the modern, standard T-configuration for
the flight instruments. Magneto and starter switches were moved to a
side panel, electrical switches were converted to internally-lighted
rocker switches, and the circuit breakers were moved to the lower right
subpanel. The C models also earned a few knots’ worth of extra cruise
speed, thanks to engine beef-ups that included better valves and valve
guides, and sturdier and better- lubricated crankshafts and camshafts.
The last of the Twin Comanches were the PA-39s, which were rolled out
in early 1970. The big improvement here was the introduction of
counter-rotating propellers. Even though Orville and Wilbur employed
this concept, Piper hawked the PA-39s as revolutionary design
breakthroughs. PA-39 C/Rs (for counter-rotating), as they were called,
had the advantage of vastly reducing the adverse effects of asymmetric
thrust in engine-out situations where the critical engine failed. The
critical engine is the engine that, if it failed, would create the worst
deterioration of performance and handling. In conventional American
light twins, the critical engine is the left engine. That’s because both
propellers rotate to the right, and the right propeller develops more
thrust than the left, owing to its comparative surplus of thrust at an
arm farther from the center of gravity than the left engine’s. Lose the
left engine and that extra thrust can make the airplane yaw
uncontrollably and, if the airspeed is low enough, cause the airplane to
roll inverted.
By having the left propeller turn to the right and the right
propeller turn to the left, the C/R models eliminate the critical
engine. Yawing moments in engine-out situations are reduced, and low
speed handling is greatly improved.
The Twin Comanche is an excellent airplane, and its value in the used
market continues to rise. The airplane is well supported, thanks to a
well-organized owners group and a plentiful supply of parts and
modifications. The pilot new to the breed should seek out qualified
instruction, maintain a high level of proficiency, and be well aware of
the airplane’s maintenance requirements. The airplane’s age should be a
warning flag to prospective buyers. Expect a continuation of the Twin
Comanche’s airframe problems and go into ownership with the
understanding that considerable investments in airframe fixes and
additional inspections may be necessary down the road.
That aside, the Twin Comanche will serve you well, and its bang for the buck is exceeded only by its classy looks.
I departed Brainard Field (KHFD) at about 9:30 am on Sunday,
September 1, 2019 to return to my home field at Danielson, Connecticut (KLZD).
The weather was clear VFR with light winds from the North.
At approximately 9:45 I entered the Danielson
pattern on the 45 to runway 31 as usual, set up for the downwind at 17″
manifold, full prop, 1st notch of flaps and gear down, giving about 90 mph
airspeed. I noticed the jump plane taking off as I entered the downwind and
made the usual pattern radio calls. As I turned base and final, I reduced power
to about 13″ manifold and pulled full flaps. As I remember the green
“gear down” indicator light was lit.
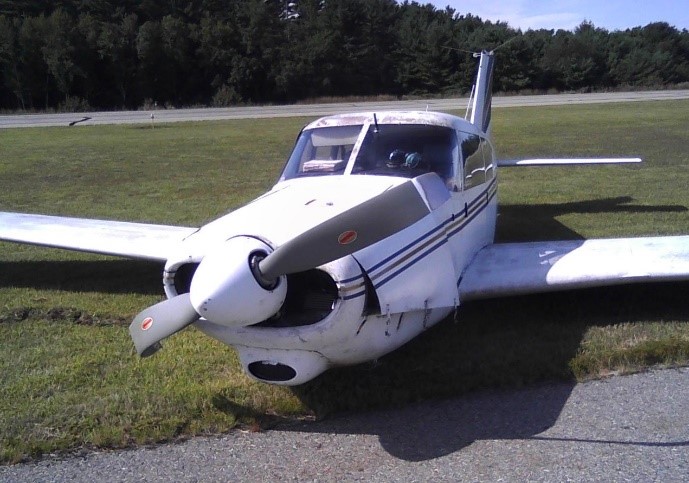
Shortly after touchdown the plane settled on
its belly and slid toward the right, exiting the runway, eventually coming to
rest across the grass at the Alpha taxiway and rotated 90 degrees to the
direction of the slide. The engine stopped part way across the grass with signs
of an obvious prop strike.
I announced on CTAF “Danielson traffic,
Comanche off runway 31, gear up”, turned off all electrical power and the
fuel, then exited the aircraft. I was the sole occupant and sustained no
injuries.
Final Resting Place
After getting permission to raise and move the aircraft, further inspection revealed that the gear motor circuit breaker was popped and the gear extension cables were bent. The gear was swung down (emergency release) and forced into position for towing. While the over-center gear locking arms were visibly not secure the “gear down” green light was on when tested. The aircraft was towed successfully to the tiedown for storage where it was subsequently inspected by Robert Lenert of the Bradley FSDO.
It is my opinion that the gear failed to
extend fully on downwind, possible as a result of the popped circuit
breaker, and then gave a false “gear down” green light indication.
On landing the unlocked gear slowly collapsed resulting in the belly skid, loss
of control and prop strike.
Unfortunately Plane was totaled
Description of damage ccccccccccc Shortly after touchdown the plane settled on its belly and slid toward the right, exiting the runway, eventually coming to rest across the grass at the Alpha taxiway and rotated 90 degrees to the direction of the slide. The engine stopped part way across the grass with signs of an obvious prop strike. Shortly after touchdown the plane settled on its belly and slid toward the right, exiting the runway, eventually coming to rest across the grass at the Alpha taxiway and rotated 90 degrees to the direction of the slide. The engine stopped part way across the grass with signs of an obvious prop strike.
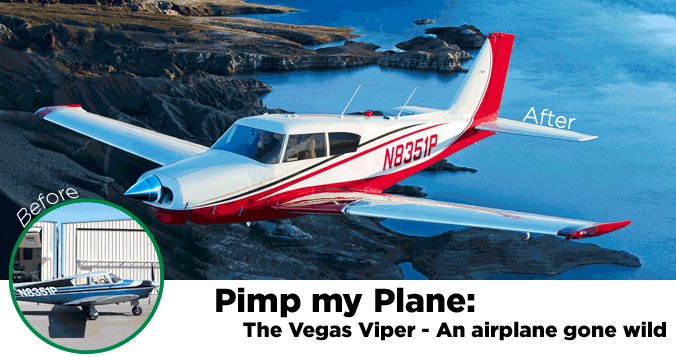
Really, it’s our fault. David Lessnick of Las Vegas was perfectly
happy with his 1964 Piper Comanche 250—until he saw AOPA’s 2008
sweepstakes airplane. He paid $80,000 for the Comanche in 2005 and was
quite happy with it. It was in perfect condition with a mid-time
Lycoming O-540 engine. Then he went to AOPA Expo a few years ago (before
the event was renamed AOPA Aviation Summit) and sat in our sweepstakes
Piper Archer with its shiny glass cockpit and luxurious interior.
“I was blown away. I climbed in it, and sat in those seats, and I was
like, ‘Wow, this is what it is supposed to be like,’” Lessnick said.
That planted an idea that would ultimately have him chrome-plating his
gas caps and custom-painting his towbar, but it would be additional
months before that journey would begin. First, there was a flirtation
with owning a jet—a second result of his visit to AOPA Expo that year.
Cirrus and Piper salesmen he met there revived his interest in jet
ownership.
Prior to the 2008 Expo, this 800-hour pilot had made a deposit on an
Emivest (Swearingen) SJ30, back when deposits were $25,000 instead of
$100,000, but he had withdrawn it when the Emivest company hit financial
problems. Expo was like a candy store: He liked the PiperJet, was
impressed with the Diamond D-Jet, but focused his dreams on the Cirrus
Vision SF50.
That same year Lehman Brothers filed for Chapter 11 bankruptcy, the
stock market collapsed, and overnight Lessnick’s real estate development
business was affected. Suddenly, he wasn’t able to get financing for
new projects. Completed projects weren’t selling for the profit he had
expected, so keeping the Piper Comanche began to look like the best
option.
Lessnick began to focus what he admits is his “slightly obsessive personality” on the Comanche. The battle between “want” and “need” began, with “want” in the lead. He loved the look and performance of the new, sleek, high-performance four-seat singles but couldn’t accept the $400,000 to $600,000 price tags that came with them. For $80,000, he reasoned, he could make his Comanche into a luxury aircraft with a glass cockpit. It already has a sports-car feel because of its crisp roll rate and gives him a true airspeed of between 150 and 160 knots at 9,500 feet to 14,500 feet, burning only 12 gallons per hour. But before it was over, the $80,000 budget would balloon to $104,000 as he had one good idea after another.
The ‘Vegas Viper’ makeover: Exterior ($21,050)
Four-color custom paint scheme with Sherwin Williams Jet Glo and Acry Glo, with two coats of clear sealant
Hand-laid stripes
Chromed fuel caps with painted fuel compartment
Chromed cowl latches, tiedown rings, and exterior handle
Polished leading edge of props
Polished spinner
Custom-painted tow bar
Custom laid-out wing walk
Proseal around all windows
All-new stainless steel hardware
New color-matching front engine baffle
LoPresti Speed Merchants Speed Spats
Knots 2U wing root fairing kit
Knots 2U wing fillet fairing kit
Johnston Aircraft Service wing tips
Knots 2U high intensity discharge (HID) landing
lights (two) upgrade
Custom-fabricated wing (rivet) patches that are unnoticeable
Rebuilt stabilator horn assembly and trim drum
Serviceable shimmy damper
Integrated navigation/strobe lights
New three-blade prop
He added a mega-annual inspection that included replacement of many parts as a precaution, since he was basically dismantling the aircraft to rebuild it. The annual turned into an airframe overhaul that came to $12,600.
While the overall project cost me almost 50 percent more than I had
originally budgeted, I really feel I got an airplane that beat any
expectations that I had by 100 percent. That’s good math in my book,”
Lessnick said.
He calculates his operating cost, given that he flies 200 hours a
year, at $130 per hour. That includes insurance ($2,100 per year on a
hull value of $175,000), the hangar, the annual inspection, Jeppesen
subscriptions, avionics upkeep, miscellaneous expenses of $2,400 per
year, and variable costs that include an average $60 per hour for fuel,
$15 per hour as an engine reserve, and $2 an hour for miscellaneous
expenses. To get the insurance company to cover the higher value, he had
to send photos of the aircraft, with invoices to prove his case, to the
agent. If he were to fly only 100 hours per year, the per-hour cost
rises to $183.
The airplane gained 116 pounds with all the modifications, from 1,750
up to 1,866, but it still has an honest 518-pound payload with full
fuel of 90 gallons, 86 usable. All seat and cargo-area pockets are
webbing instead of cloth or plastic. The webbing came from a local
Mercedes Benz parts department.
“The trick is thinking through all the details, and visualizing it before you start on the project,” Lessnick said.
A head start
Before he saw the sweepstakes Archer, Lessnick did what he thought
were sensible things that improved safety and performance. He upgraded
from a generator to an alternator, swapped out the two-blade propeller
for a three-blade propeller, and replaced the mechanical tachometer with
a digital one. He ignored paint and interior upgrades because they were
“wants.” He was being very practical. Yes, he was. Then he watched his
favorite television show, Pimp My Ride, in which automobile
owners load their cars with high-end, extraordinary embellishments. The
memory of the AOPA Archer came to mind, and the dreaming began. What if
he “pimped” his airplane?
Practically speaking, he didn’t need a new panel. He bought the
airplane with a Garmin GNS 530 for communications and GPS navigation. It
also had, when purchased in 2005, a Cobham/S-Tec System Thirty
autopilot with GPS steering, and a JPI EDM-700 engine monitor with
fuel-flow readout. He added a Garmin GPSMAP 696 with XM WX satellite
weather and radio. He did not need a new panel, he said, but he wanted a new panel “…like a spoiled adolescent.”
Two choices for a glass panel emerged: the Aspen Avionics Evolution
Pro series of products, or the Garmin G500, upgradable to synthetic
vision. Aspen’s rebate caught his attention, and he liked the system—but
he not only liked the G500, he “drooled” over it. The drool factor
tipped the scales slightly toward Garmin. Still, he ordered and paid for
the Aspen system (being practical again), then cancelled it and ordered
the Garmin G500. (He still has the Garmin 530, upgraded to include
WAAS.) Since he could use the JPI EDM-700 connection to upgrade to a
newer model, he ordered the EDM-830, a more capable display showing fuel
and battery status, oil temperature, manifold pressure, and rpm.
“I’m a real estate developer and builder,” Lessnick said. “It was just like building a custom house. You start with a small idea—in my case it was the seats. All of a sudden you realize, if the seats look so good, now the overhead panel has to be unique. And the side panels have to be redone. And, oh, my gosh, the knob for the flaps. I can’t leave it the way it is now. And the door handle has to be changed. I can’t leave a 1954 Ford Fairlane door handle on the airplane. Every little piece of that airplane has a part of me in it, and it’s very, very unique.”
AOPA’s interior shop
Lessnick spent 200 hours on the Internet researching the best of the
best, from paint to interiors—and the best paint and interior shop to do
the work. He ultimately picked Oxford Aviation in Oxford, Maine, partly
because the AOPA Archer was done there. That meant he had to fly his
aircraft more than 2,000 nautical miles from Nevada.
The ‘Vegas Viper’ makeover: Interior ($33,078)
Custom-designed and hand-sewn seats from Spinneybeck leather
Hand-cut instrument panel with silk-screen lettering
Highest-grade wool carpeting
Custom fabricated pilot’s seat armrest
Custom fabricated Fiberglas over-head console with built-in oxygen and touch-adjusted LED lighting
Gillen-phx door and trim handles with rosewood accents
Updated side panels
New plastic trim pieces covered in Spinneybeck leather
Kosola and Associates retractable shoulder belts
Custom rosewood accent pieces throughout
Custom fabricated rear seat console with fold-down armrest and cup holders
Polished air vent pieces
Brushed aluminum air vents
Headset holder straps
Rosen Sunvisor Systems sunvisors
Tinted quarter-inch glass all the way around
State-of-the-art soundproofing and insulation
Improved upper door latch system
Updated leather-wrapped control wheels
Leather-covered glareshield with French seam stitching
Custom fabricated rosewood vents for Arctic Air Cooler system
Custom fabricated fiberglass seat backs with built-in DVD system
All-new door seals
Polished rudder pedals
Custom pen and flashlight holder
Here are the highlights of what he now calls the “Vegas Viper.” (He
even has water bottles with that name on it, branded water to enhance
the passenger experience, but in truth they weren’t very expensive.).
Seats. The seats were stripped to the frame, and
then rebuilt with multi-density foam, similar to the memory foam used in
the Sealy memory-foam mattress. “I can sit in there for hours and hours
and not be fatigued at all,” Lessnick said. He got the idea from a
picture of the seats used in the Porsche Panamera, and sent the picture
to Oxford.
The front seats of the Panamera also have a hard back, as opposed to
fabric, so the designers at Oxford Aviation built a custom mold and
created two Fiberglas backs with a cutout for a DVD screen. “That was my
goal, my vision. I wanted to get into the best Bentley [car] with the
best stitching, the best materials, and inlaid woods.”
The seats were custom made to his measurements.
Overhead panel. It is a one-of-a-kind custom design.
First, a custom mold was made for a Fiberglas panel. Then, Brazilian
rosewood was inlaid so that the wood grain lines up perfectly despite
the angles in the panel.
DVD screens. Lessnick has twin 12-year-old daughters
who like to watch movies in flight when they accompany their dad on
business trips to Southern
California. The idea for the screens came from the automotive world. “We
got a field approval [from the FAA] and the avionics shop made sure
there was no interference with the new glass avionics I put in the
airplane,” Lessnick said. A DVD player behind one of the screens plays a
movie on both. The children listen through noise-canceling headsets.
Chrome everywhere. The tail tiedown, the wing tiedown rings, and the fasteners for the engine cowling are chromed. Why so much chrome?
“You know, it’s from Vegas. I want a little bling. I want something
to shine a little bit,” Lessnick said. The aircraft is based at North
Las Vegas Airport, but during the preparation for this article it was
temporarily at Henderson Executive Airport in Henderson, a southern
suburb of Las Vegas. There, chains are used to tie down aircraft. Former
F–16 pilot Murray Robinson, who led the formation for air-to-air photos
in this article, helped to remove them link by link to avoid damaging
the chrome plating.
Vegas Viper name. Where did the name come from? “I
wanted something that would stick in people’s minds. I knew this was
going to be a special airplane,” Lessnick said. “I like the
alliteration.”
Speed mods. His aircraft picked up several knots thanks to speed modifications for the wheel wells and re-rigging of the airplane after it was painted. Older airplanes that are out of rig lose several knots because of increased drag. The Wheel Spats smooth the airflow and reduce drag caused by retracted but somewhat exposed main-gear wheels. Wing root fairings smooth the airflow over the stabilator, and provide the pilot more control authority on landing.
Finally, Johnston Aircraft Service wing tips were added to improve
aileron authority when flying at lower speeds—OK, actually they look
good and that was the primary reason.
Soundproofing. “We put in special soundproofing,”
Lessnick said. “Not only does it dampen the audible sounds, but the
vibrations that come from the airplane. So the fatigue factor has been
greatly reduced. I typically fly two-hour missions. But I’ve been flying
more long, long cross-countries, literally like from the East Coast to
the West Coast. I went to Oshkosh, I’m going to Sun ’n Fun, AOPA Summit.
It is just an absolute joy to fly in now.”
“The soundproofing [uses] Oxford Aviation’s proprietary materials,
the same ones we used to soundproof NOAA’s [National Oceanic and
Atmospheric Administration] Hurricane Hunter,” said Jim Horowitz,
president of Oxford Aviation
“Our Super Soundproofing starts with a skin dampener; lead would be
great but it would be too heavy, obviously. We use an impregnated vinyl
cut into an X pattern to stop the oilcanning of the skin. A three-part
mix of different and unique frequency-absorbing glass and foams are
sandwiched into Mylar heat-sealed packets. Each and every fuselage side,
floor, and roof partition is insulated this way. We actually number
them specific to the location so that they can all come out and go back
in the way they were designed and built. Last, soundproofing materials
are adhered to the side panels and carpeting.”
Air conditioning. It easily hits 120 degrees
Fahrenheit on the ramp during most Las Vegas summers. Lessnick
reconfigured an Arctic Air Cooler used by many small aircraft owners.
“You’ll see what look like wooden speaker grills,” Lessnick said.
“That’s not what that is. The tubes from the Arctic Air come up through
there.” He has an electrical outlet in the cargo compartment where the
Arctic Air unit sits, strapped down. A switch in the cockpit allows him
to turn it on.
“It cools the cabin 30 degrees. It’s wonderful. If I need the extra useful load, I just take out the Arctic Air,” he said.
The ‘Vegas Viper’ makeover: Avionics ($37,350)
Garmin G500 with synthetic vision option
Garmin GNS 530W
Garmin GDL 69A XM satellite receiver with XM radio and XM WX weather
Garmin GA-55 XM WX data antenna
Garmin GTX 330 with active traffic alerts
Garmin GMA 340 audio panel
Cobham/S-Tec System 30 autopilot with GPSS roll steering integrated into G500
JPI EDM-830 digital engine monitor that displays manifold pressure,
RPM, OAT, oil pressure, oil temperature, and percent of horsepower
Precision Aviation vertical card compass
Addition of music jacks for rear-seat passengers for separate source selection
Updated circuit-breaker panel
Done…well, not quite
So, David, are you finished yet?
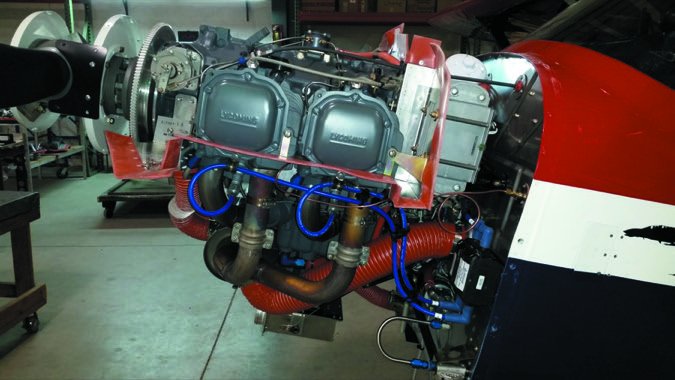
“I do need to do firewall-forward. My engine is almost at TBO. When I
redo the engine I am going to put a factory-new Lycoming O-540, which
is what the airplane came with. I’ll put a dual exhaust in it. I’ll have
the valve rocker covers chromed. I got inspired when I went to Oshkosh.
There’s always something to do.” When Lessnick showed his airplane in
competition at EAA AirVenture 2010, he came home with the best-in-class
trophy. When the engine work is done he will have a total investment,
including the purchase price, of $228,171.
Will that complete it?
“We’re in the 99-percent ballpark right now. There are a few things I
still have to do. I want to put in a [Garmin] 430 with WAAS, so I will
have two. And let’s see, there’s one other thing I want to do. It
escapes my mind.”
“What are the chances that you are going to find something to do after you think it is completed?” he was asked.
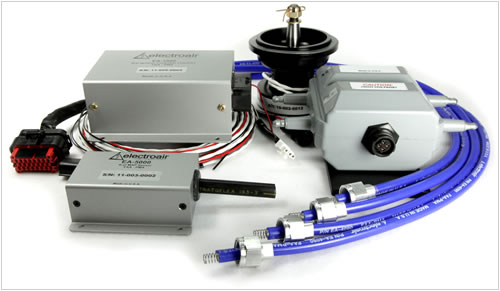
The EIS-61000 Electronic Ignition Kit is a fully STC’d kit for Lycoming 540/541/580 series, engines, installed on both single engine and twin engine aircraft. Replacing one magneto with the EIS-61000 will typically improve fuel economy on average by 10-15% (operators have reported consistent fuel savings of 1.5-2.0 gph or greater). Additionally, there will be an improvement in horsepower, smoother engine operation, easier hot starts and improved high altitude performance. The EIS-61000 adjusts spark timing automatically by way of our MAP Sensor – timing is adjusted with altitude. Most parts on the EIS-61000 are not life limited (reference the I.C.A. for recommended maintenance) – this combined with reduced spark plug fouling means lower maintenance costs. This kit can be used on either 12V or 24V systems.
Big savings to Northeast Tribe members as part of this Group Buy: EIS-61000IC, and a keyless Switch panel; plus, four (4) Massive plugs, a total of $4,449.70 (vs $4,886.50, a $436.80 savings) or (4) fine wire plugs, a total of $4,689.70 (vs $5,260.00, a $570.30 savings) The switch panel (a $269.00 item) is gratis to active duty or retired military personnel + Shipping extra.
The EIS-41000IC Electronic Ignition Kit is a fully STC’d kit for most Lycoming and Continental 4cyl engines. Replacing one impulse coupled magneto with the EIS-41000IC will typically improve fuel economy on average by 10-15% (many operators have reported consistent fuel savings of 1gph or greater). Additionally, there will be an improvement in horsepower, smoother engine operation, improved high altitude performance and better starting performance. The EIS-41000IC adjusts spark timing automatically by way of our MAP Sensor – timing is adjusted with altitude. Most parts on the EIS-41000IC are not life limited (the MTH is recommended to be changed at overhaul of the engine; spark plug wires on a regular interval) – this combined with reduced spark plug fouling means lower maintenance costs. This kit can be used on either 12V or 24V systems. Note: hand propping with an electronic ignition system is not recommended. Hand propping aircraft is a very dangerous activity and is never recommended or advisable.
Big savings to Northeast Tribe members as part of this Group Buy: EIS-41000IC, and a keyless Switch panel; plus, four (4) Massive plugs, for a total of $2,684.80 (vs $3,380.00, a $695 savings) or (4) fine wire plugs, for a total of $2,844.80 (vs $3,628.00, a $785 savings) The switch panel (a $269.00 item) is gratis to active duty or retired military personnel + Shipping extra.
SureFlys drop-in electronic ignition may not offer more power, but it has an engine-matching TBO, is easy to install and promises maintenance-free reliability.
After years of hemming and hawing, the piston aircraft engine
industry could be finally coming to its senses by embracing electronic
ignition. Electroair has been selling electronic ignitions for a couple
of years, and now SureFly—a
company stemming from Sky-Tek (starters) and Plane-Power
(alternators)—is nearing FAA certification of an electronic replacement
it calls the SIM, for SureFly Ignition Module.
I recently visited with Granbury, Texas-based SureFly for a close look at the product. Here’s a report.
Ancient History
You know, we fly some pretty darned interesting machines. They are
made as lightweight, strong and redundant as possible considering the
materials needed. If the electrical system fails, the engine will keep
running thanks to technology developed for cars in the late 1800s.
The spark plugs do their job because of the magnetos. Think of
magnetos as small generators that create electricity independent of the
electrical system by spinning a magnet in an electric field. Andre
Boudeville developed the first low-voltage mag, but the high-voltage (or
tension) magnetos were developed in 1889 by Fredrick Richard Simms and
Robert Bosch, with the addition of a coil. These created a high-voltage
spark that was needed for ignition systems in automobiles. Some used a
secondary coil to increase the voltage and some presented the charge
directly to the spark plug.
For aircraft engines, magnetos were a godsend because they were
independent of the electrical system, fairly compact and relatively
lightweight. Aircraft engines were designed with two spark plugs per
cylinder and two mags simply as a means for keeping the engine running
should one of each fail.
I once lost an alternator in a Grumman Tiger after taking off in New
Mexico. Rather than being stranded, I simply turned off the electrical
system and flew the airplane (in Piper Cub fashion) back to home base. A
rebel, perhaps, but I might not have tried this with just one magneto
on the engine.
Electronic ignition retrofits for aircraft engines have been around
since the early 1980s. Klaus Savier sold the Light Speed system starting
around 1986, and these have worked on plenty of experimental aircraft
engines—relatively problem free—for three decades. But since things in
the certified world seem to drag on, electronic ignitions haven’t gained
traction. Change could be in the air.
Costly Challenges
There are two challenges in bringing electronic ignitions to market
and in a way, they’re both related. One is a price-sensitive market and
the other is dealing with the rigors of FAA certification. The
certification effort is incredibly costly and ultimately passed down to
the consumer. Moreover, it would seem that the FAA hasn’t been exactly
welcoming of electronic ignition technology.
Developers (including SureFly) recognized this and have pursued STCs
that require the retention of the right-hand direct-drive mag (or
typically the one without the impulse coupling), while replacing the
left mag with the electronic unit. Retaining one mechanical mag retains
some system independence from electrical requirements—significantly
easing certification efforts.
Michigan-based Electroair has led the field with certified kits for
both Lycoming and Continental engines. It obtained its first AML-STC in
2011 and the list is growing. We covered the Electroair ignition in the
October 2014 issue of Aviation Consumer.
Enter SureFly
SureFly was started by the brainchildren of Sky-Tek and Plane-Power.
After selling those companies, the crew began thinking about electronic
ignitions. Jason Hutchinson, SureFly’s general manager, told me the SIM
electronic ignition (which is expected to be certified in the coming
months) was designed in only 30 days. The idea was to keep it simple,
dependable and inexpensive. Essentially, the SIM is designed to directly
replace and do what a traditional magneto does—no more. SureFly built
several prototypes and installed them on the Lycoming engine in
Hutchinson’s RV-6 and on the engine of an experimental Bellanca Viking.
Like Electroair’s system, the SureFly electronic magneto is
completely solid state. Rather than using spinning magnets and a bunch
of anachronistic parts, the concept is to electronically convert battery
power into a high-voltage signal and pulse it to the right cylinder at
the right time. Like the Electroair system, the SureFly ignition uses
standard wiring harnesses for a given engine.
The beauty of the SureFly system is its simplicity. One unit is
basically the same size and weight as a Slick mag and a couple of pounds
lighter than a Bendix. There are no moving parts, it’s fully electronic
and it requires no software updates.
The electronic mag can be adjusted to any engine’s base timing
advance (specified on the engine data plate) by a little switching
module that is accessible through a large port on the case. There is
more spark energy throughout the RPM range and the dwell is adjusted
automatically. Each spark plug has its own dedicated coil, virtually
eliminating coil failures.
There is no impulse coupling, as the unit controls timing by manifold
pressure and RPM. Below 400 RPM, the timing is set to TDC, with a
longer dwell and increased voltage, ensuring cold or even fouled spark
plug starts.
Easy Installation
The SureFly SIM is quite simple to install. According to SureFly, it
should take an experienced tech roughly an hour to install the first
one, not counting disassembly. There are no extraneous boxes or wiring
harnesses to retrofit on the engine.
A power wire, ignition switch P-lead and manifold pressure connection
are required for the installation. The engine’s RPM signal is picked up
within the module from the crank gear. Designed to last throughout the
TBO of the engine for which it’s installed on, there should be no
downtime for regular inspections, no messing with the timing or risking
the possibility of failures due to these inspections/adjustments.
As for instructions for continued airworthiness, SureFly’s SIM
installation manual advises, in part, that during the annual or 100-hour
inspection one should simply check the installation for engine oil
leaks.
During installation, power is applied to the timing lug and before
tightening the base clamps, the unit is moved slightly left and right to
ensure that the LED indicator is off. The power lead is then moved to
the power post and the engine is ready for ground running.
Versus Electroair
SureFly is expecting to have FAA certification for its SIM before
this coming summer. The SIM for four-cylinder engines will have a list
price of $1250 and the six-cylinder SIM will cost $1550. Dealer
discounting is possible. With disassembly, reassembly, paperwork and
testing, typical labor costs should be well under $500—which is a real
savings. The other savings, compared to traditional magnetos, is not
having to pay for teardown and inspection.
But understand that the SIM doesn’t have unlimited life. Overhaul
pricing hasn’t been determined, but there are simply two bearings and
one drive shaft in the four-cylinder version and two additional bearings
for the six-cylinder version. That could keep overhaul costs low.
Once the SureFly SIM is certified, buyers will have to choose between
it and the Electroair ignition. The Electroair has a starting street
price of around $1600 for four-cylinder engines and as high as $2500 for
some six-cylinder engines. List pricing is considerably higher. The
Electroair system is designed to last until the TBO of the engine.
If performance gains are the motivating factor, buyers will likely be
drawn to the Electroair system because it has variable timing, which
offers more power and better fuel efficiency. Electroair began
development of its six-cylinder model in 2012, and has since received
certification of the EIS-61000 system for large-bore Continental
engines.
The SureFly SIM was not designed for performance enhancements,
although some fuel efficiency is expected. The whole idea was to offer a
dependable, low maintenance, stone simple electronic ignition that can
be sold for a reasonable price. Remember, too, that SureFly’s SIM will
be certified for basically all four- and six-cylinder engines
immediately, due to the ability to adapt a common module to every four-
or six-cylinder engine.
As it goes in all fields of endeavor, the last guy to bring something
to the table has all of the first guys to learn from. In my estimation,
the SureFly crew is a sharp bunch, they are all pilots and aircraft
owners and they are all thinkers. They’ve had a proven track record of
success from the get go, including their unabashed modification of
automotive starters for aircraft application. After all, if it works,
why redesign the wheel trying to change it?
For simplicity and for saving space in the engine bay, plus saving
weight and reducing installation cost and complexity, the SureFly SIM
could be the best choice for an electronic ignition retrofit. On the
other hand, it isn’t FAA certified yet, which—for now—gives Electroair a
sizable advantage.
When he’s not drumming in his band Revolushn, contributor Jim Cavanagh flies and wrenches several of his own aircraft.